A Tip on how to adjust the lineweights in pipe color fill legends
When you get busy coordinating a huge BIM development process sometimes you really forget to pay attention to some handy tools Revit has got and get carried away looking for a complicated solution of a "problem" that wasn't even a problem at all. However, you didn't expect that there could be a dedicated solution.
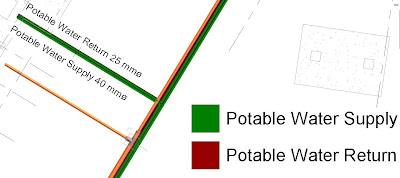
That's what has happened today in the morning when I suddenly was asked by one of our modellers on how to change the line weight of a pipe color fill legend. So here is the deal. We've modeled a potable water (supply & return) in Revit and our plot scale was somewhat 1:300 or 1:500. Whereas, we have pipes of 25mm DIA, and when we place a pipe color fill legend it creates a color background much wider than the pipes all along.
I started breaking my head around, switching line weights on and off didn't help. I tried google-ing to see if somebody came across the same thing but nothing. It seems that only I was really somewhat blind to notice or pay attention to the dedicated controls of Edit Scheme for Pipe Color Fill Legend dialog box right on the lower right corner.


 Enjoy!
That's what has happened today in the morning when I suddenly was asked by one of our modellers on how to change the line weight of a pipe color fill legend. So here is the deal. We've modeled a potable water (supply & return) in Revit and our plot scale was somewhat 1:300 or 1:500. Whereas, we have pipes of 25mm DIA, and when we place a pipe color fill legend it creates a color background much wider than the pipes all along.

I started breaking my head around, switching line weights on and off didn't help. I tried google-ing to see if somebody came across the same thing but nothing. It seems that only I was really somewhat blind to notice or pay attention to the dedicated controls of Edit Scheme for Pipe Color Fill Legend dialog box right on the lower right corner.

Just change the valuses of this two boxes and calibrate it to your scale. I needed to reduce both some 10 times to get what I want.

Zoom in more to see what happens.


Comments
Post a Comment